What I love most about Pedra da Gávea is that perfect moment when you finally reach the summit after conquering the infamous Carrasqueira section. Standing 844 meters above Rio, with the endless Atlantic stretching before you and the iconic cityscape at your feet—it’s a view that makes every grueling step worthwhile.
What Is Pedra da Gávea?
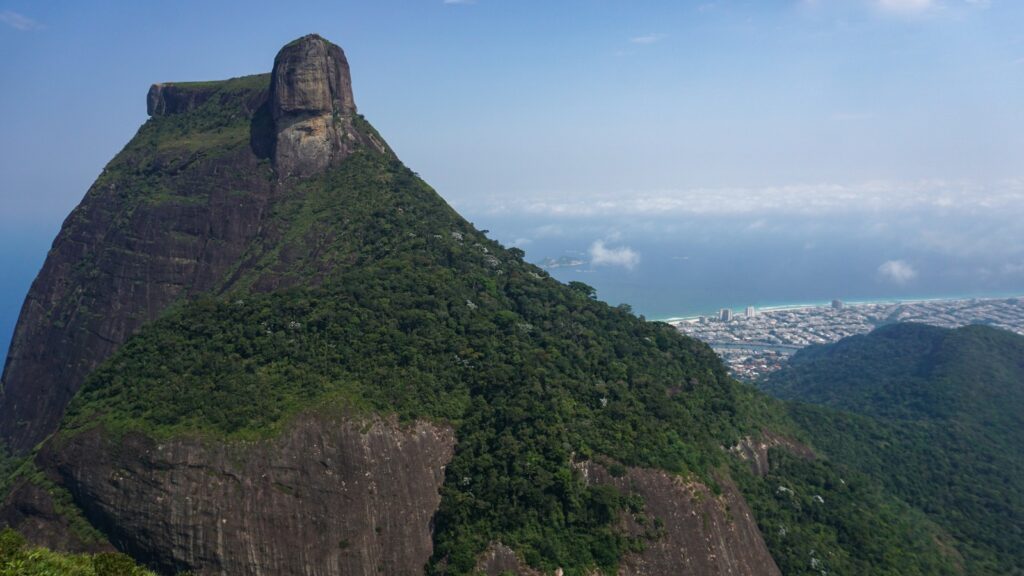
Pedra da Gávea is a massive monolithic mountain located in Rio de Janeiro’s Tijuca National Park, standing proudly at 844 meters (2,762 feet) between the neighborhoods of São Conrado and Barra da Tijuca. It’s one of the highest coastal mountains in the world that drops directly into the ocean.
The name “Pedra da Gávea” translates to “Rock of the Topsail,” given by Portuguese sailors in 1502 who thought its distinctive silhouette resembled the topsail of a carrack (a type of sailing vessel). Geologically speaking, it’s primarily composed of granite and gneiss, with formations dating back an incredible 450 to 600 million years.
The Trail: What to Know Before You Go
Let me be clear—this is not your typical tourist hike. Pedra da Gávea is considered one of the most challenging trails in Rio, and for good reason.
Trail Overview
- Distance: 7.2 kilometers (4.5 miles) round-trip
- Elevation Gain: 754 meters (2,474 feet)
- Duration: 4-5 hours round-trip, but if you’d rather take your time and not rush, budget closer to 6 hours.
- Difficulty: Strenuous—definitely not for beginners
Starting Point & Access
The trailhead begins near a small park ranger post in an area called Barrinha in Barra da Tijuca. You must sign in at the Tijuca National Park entrance before hitting the trail. The park is open from 8:00 AM to 5:00 PM, and they won’t allow people to start ascending after 2:00 PM (for good reason—you don’t want to be descending in darkness).
Quick tip: There are no bathrooms along the trail, so make sure to use the facilities near the entrance before you start your hike.
The Hike Breakdown
The trail itself can be broken down into a few distinct sections:
- Initial Forest Path: The journey begins with a steep ascent through the Atlantic Forest. The path here is clearly marked but challenging, with exposed tree roots and rocky terrain. About 30 minutes in, there’s a small detour to Cachoeira da Gávea, a scenic little waterfall that’s worth a quick photo stop.
- Praça da Bandeira: After about 1-1.5 hours of hiking, you’ll reach this flat area that serves as an important rest stop. Take a breather here—the views start getting good, but the most challenging part is yet to come.
- The Carrasqueira: This is the make-or-break section that gives Pedra da Gávea its fearsome reputation. It’s a nearly vertical 30-35 meter rock face that requires basic rock climbing skills. There are official signs warning of death risk, which might sound dramatic but shouldn’t be ignored.
- The Summit Plateau: Once you’ve conquered the Carrasqueira, the trail eases up as you walk across the spacious plateau to reach the true summit. The last bit is fairly straightforward compared to what you’ve just accomplished.

Getting There and Away
If you’re based in the popular tourist areas like Copacabana or Ipanema, you’ll need to do a bit of advance planning to reach this somewhat out-of-the-way trailhead.
Public Transport Option
If you’re using public transportation:
- Take the Metro Line 4 (yellow line) to Jardim Oceânico station, which is the last stop
- From there, you’ll need to take either a taxi or Uber for approximately 15 minutes to reach the trailhead
- The exact address for your driver is: Estrada Sorimã, 932 – Itanhangá, Rio de Janeiro
Top tip: Save this location offline in Google Maps before you go, as some drivers might not be familiar with the exact trailhead spot.
Taxi/Uber Direct
If you’re coming from other parts of Rio:
- From Copacabana/Ipanema: Expect a 30-40 minute drive (longer in rush hour)
- From Centro: Around 45-60 minutes depending on traffic
- From the North Zone: Approximately 30-45 minutes
An Uber from Copacabana to the trailhead typically costs between R$40-70, depending on time of day and demand.
The Infamous Carrasqueira Section
I can’t emphasize this enough: the Carrasqueira is serious business. This 30-meter vertical rock face requires actual climbing techniques, not just hiking. There are three ways to tackle it:
- Free climbing: For experienced climbers only. Even then, I don’t recommend this unless you really know what you’re doing.
- Guided climb with equipment: The safest option is to go with a professional guide who brings proper climbing gear (harnesses, ropes, etc.).
- On-site assistance: There are often local guides (like “Formiga da Montanha” or “Tony”) stationed at the Carrasqueira who offer rope support for about R$60 round trip (prices may vary). This is a popular option for many hikers, but it’s not guaranteed they’ll be there every day.
Bear in mind that this section is genuinely dangerous if attempted without proper preparation. Use proper three-point contact climbing techniques, stay close to the rock, and move cautiously, especially if carrying a backpack.
Summit Rewards: Worth Every Drop of Sweat
Reaching the summit of Pedra da Gávea feels like standing on top of Rio. The 360° panoramic views are simply spectacular, encompassing:
- The endless coastline of Barra da Tijuca
- São Conrado beach directly below
- Iconic landmarks like Christ the Redeemer and Sugarloaf Mountain
- The blue expanse of Lagoa Rodrigo de Freitas
- The Atlantic Ocean stretching to the horizon
The summit itself is surprisingly spacious, with plenty of spots to rest, have a snack, and of course, take those all-important photos. Speaking of which, there are some famous photo spots you won’t want to miss:
- The “Cadeirinha”: A rock formation that creates the illusion of sitting on a cliff edge (though it’s safer than it looks in photos)
- The “Face of the Emperor”: A naturally weathered rock formation that resembles a human face (though it’s just natural erosion, despite myths about ancient civilizations)
- The “Crown of the Emperor”: A circular rock cluster, some interpret as resembling a crown
Occasionally, there are even vendors selling cold drinks at the top. A cold Coke or guaraná after that climb feels like liquid gold, though prices are predictably inflated.

When to Hike
The best time to tackle Pedra da Gávea is during Rio’s dry season, from May to October.
This period offers more stable weather and a much lower chance of rain—crucial because the trail becomes significantly more dangerous when wet. After heavy rain, the trail—especially the Carrasqueira—becomes dangerously slippery, making descent risky and accidents more likely. If it has rained in the past 24 hours, it’s best to reconsider your hike.
As for timing during the day, an early start is essential:
- Aim to arrive at the park entrance by 8:00 AM
- This gives you plenty of daylight for both ascent and descent
- You’ll avoid the worst of the midday heat
- You’re more likely to find other hikers (safety in numbers)
If possible, go on a weekday. The trail gets very crowded on weekends, which can slow you down and make the climbing sections more stressful. Weekdays are generally quieter, giving you a more peaceful—and safer—experience.
The good news is that if you start early, you’ll likely be back down by mid-afternoon, leaving plenty of time to recover with a cold drink at one of São Conrado’s beachside kiosks. After all, you’ve earned it!
What to Bring
Proper preparation is crucial for enjoying this hike safely:
- Water: At least 2-3 liters per person (there’s no water source on the trail)
- Food: Energy-dense snacks and lunch (sandwiches, fruit, nuts, energy bars)
- Footwear: Hiking boots with good ankle support and aggressive tread are essential
- Sun protection: Hat, sunscreen, and sunglasses (upper parts of the trail are exposed)
- Bug repellent: Particularly important in the forested sections
- Small backpack: To keep your hands free for the climbing sections
- Phone/camera: Fully charged for those epic summit photos
- Cash: In case you need to pay for rope assistance at the Carrasqueira
- Trash bag: No bins along the trail, so bring a small bag to pack out your trash and help preserve the natural beauty
And what I consider optional but helpful:
- Hiking poles: Useful for the descent, though you’ll need to store them during the climbing section
- Light jacket: The summit can be windy, even on warm days
- First aid basics: Bandages, painkillers, blister treatment
Safety Considerations
I don’t want to scare you off, but it’s important to be realistic about the challenges of this hike:
- Physical fitness: You need to be in good condition. This isn’t a casual stroll—it’s a strenuous hike with a climbing section.
- Group hiking: Never attempt this trail alone. Go with at least one other person, preferably in a group.
- Guides: If you’re unfamiliar with the trail or basic climbing techniques, hire a certified guide. They typically charge R$150-300 per person, depending on group size.
- Weather awareness: Never attempt this hike during or after heavy rainfall. Check the forecast carefully.
- Time management: Start early and give yourself plenty of time. If you’re not at the Carrasqueira by early afternoon, consider turning back.
- Descent planning: Going down can be just as tough as going up—especially with tired legs. Take breaks, stay hydrated, and descend cautiously to avoid missteps.
- Wildlife: This is a natural area, and wildlife encounters are possible—especially snakes. Stay alert, wear long pants and sturdy boots, and never put your hands where you can’t see. If you do come face-to-face with a snake, back away slowly and give it space.
- Limited phone signal: There’s little to no phone reception on much of the trail. If you’re going (especially solo), let someone know your plans and estimated return time. Download offline maps, and consider carrying a whistle for emergencies.
- Clothing & gear: Wear breathable layers, sun protection, and grippy shoes. A small first aid kit, plenty of water, and some snacks are always a good idea.
Guided Tour Options
If you’re not comfortable tackling this challenging hike independently, guided tours are an excellent option. Several companies offer organized hikes to Pedra da Gávea, typically including:
- Professional guides specialized in eco adventures
- All necessary climbing equipment for the Carrasqueira section
- Transportation to and from the trailhead
- Small group sizes (usually limited to 6-10 participants)
Most tours last around 6-8 hours in total, with approximately 3 hours dedicated to the ascent.
Top tip: Tours usually require a minimum of 2 participants to operate. If this minimum isn’t reached, you’ll typically be offered an alternative date or a full refund.
With a guided experience, you’ll benefit from:
- Local knowledge about the flora and fauna of Tijuca National Park
- Safety assistance during the challenging Carrasqueira climbing section
- Strategic photo stops at the best viewpoints
- Some guides even provide extras like first aid kits and phone chargers
Bear in mind that even with a guide, this hike is still physically demanding. Tour descriptions typically classify it as medium to difficult, and it’s not recommended for people who aren’t regularly physically active.
The good news is that no previous rock climbing experience is required—your guide will provide all necessary instruction and support during the technical sections.
Alternative Routes and Nearby Options
If you’re having second thoughts about Pedra da Gávea (which is perfectly reasonable), there are alternatives:
- Pedra Bonita: A much easier hike nearby with similar views, accessible partly by car
- Morro Dois Irmãos: Less strenuous but still offers amazing views (note: access involves passing through a favela, but it’s generally safe with a guide)
- Morro da Urca: The first section of the Sugarloaf Mountain cable car route can be hiked
There’s also an alternative route on Pedra da Gávea itself called “Garganta do Céu” (Throat of the Sky), which leads to a natural arch. However, this is even more demanding than the standard route and best left to experienced hikers.

My Personal Experience: What Makes It Worth It
The first time I attempted Pedra da Gávea, I nearly turned back at the Carrasqueira. Standing at the bottom of that rock face, I seriously questioned my life choices. But after watching a few other hikers tackle it and getting some help from the locals with ropes, I pushed through—and I’m so glad I did.
The sense of accomplishment upon reaching the summit is unlike anything else in Rio. Yes, you can visit Christ the Redeemer or Sugarloaf with minimal effort, but conquering Pedra da Gávea gives you a connection to the landscape that’s simply impossible to get any other way.
And the descent? Well, let’s just say my legs felt like jelly for about two days afterward! But the memories and photos make it all worthwhile.
The Ultimate Rio Adventure
Pedra da Gávea isn’t just another Rio tourist attraction—it’s a genuine adventure that requires preparation, respect, and determination. If you’re up for the challenge, it offers one of the most rewarding hiking experiences in Brazil, if not all of South America.
Just remember: respect the mountain, know your limits, and when in doubt, hire a guide. The summit will still be there another day if conditions aren’t right.
And one last tip? Bring a tiny Brazilian flag for your summit photo. It’s a bit cheesy, sure, but it makes for an unforgettable memory of conquering one of Rio’s greatest natural challenges.